Registration
Learn how to register with institutions to access the open banking network.
Introduction
Registration with an institution is required before you can use Yapily's API to access data or make payments with that institution. You must register with each institution you wish to connect to.
There are 2 registration options depending on whether you are a regulated entity:
- Direct registration : If you are regulated by a central authority (e.g. the Financial Conduct Authority in the UK), you can register with each institution using your own open banking certificates in the Yapily Console.
- Delegated registration : If you are unregulated, you can register with each institution using Yapily Connect, Yapily's FCA registered entity. In this case, Yapily will handle all institution registration requirements.
Direct registration
If you already have an AISP and/or PISP license with a central authority, the following steps are required for you to connect to ASPSPs through Yapily.
1. Prerequisites
Depending on which regions you want to be an AISP and/or PISP in, you need to first complete the required prerequisites:
2. Upload certificates
Once you have created the required certificates, the next step is to upload the appropriate certificates to the Yapily Console.
- Log in to the Console
- Navigate to Certificates and select Upload Certificate
- Upload your certificates
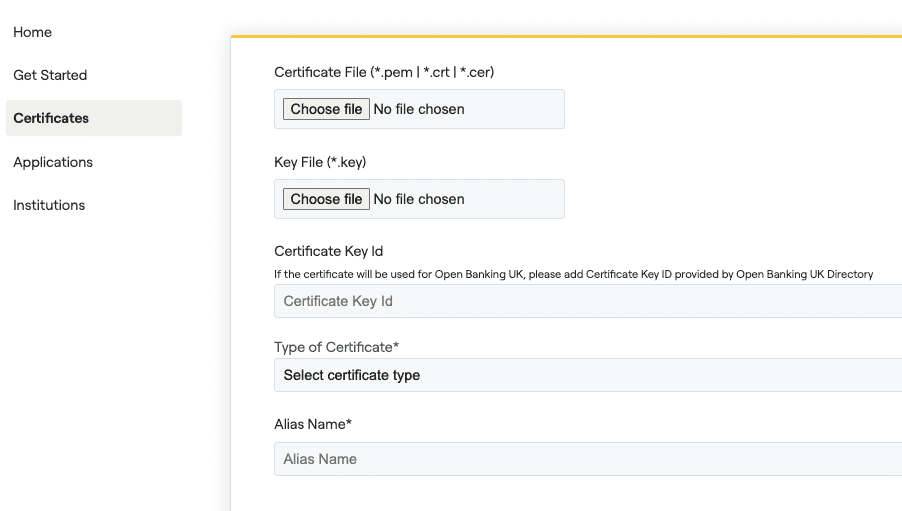
Note: You need to go through this process twice; once for the transport certificate (OBWAC or QWAC) and once more for the signing certificate (OBSeal or QSEAL). You need to upload the appropriate .pem file and .key file for both certificate types you upload.
If you have followed the naming convention for the appropriate certificates you are uploading (Naming your Open Banking Certificates or Naming your eIDAS Certificates), then you should be able to fill in the following fields:
- Certificate Key Id : This only applies to OBWAC and OBSeal certificates types and the value to use comes after KID in the file name
- Type of certificate : This is indicated by the first value in the file name
- Alias Name : Copy the file name without the extension
3. Register institutions
Once you have successfully uploaded your certificates, the next step is to register each Institution you wish to connect to on the Yapily Console.
There are 3 different types of institution that can be setup:
-
MOCK -
SANDBOX -
LIVE
Both MOCK and SANDBOX are for sandbox testing. LIVE is for connections to real consumer and business accounts.
Register an institution:
- Go to Applications and select your application
- Select the Connected Institutions tab
-
Your added institutions appear under
Not Registered
. If you haven't already added an
Institutionto your application, select Add Institutions to choose theInstitutionand add it. -
Click on
Register
next to the
Institutionto begin the registration process. - There are multiple ways to register with an institution. See certificate registration, manual registration and dynamic client registration for further guidance.
- Once you have provided the required information, click Register to complete the registration process. Your registered institutions will appear under Registered .
Certificate registration
During the registration process, you need to add your signing and transport certificates. This is either your Open Banking certificates (OBWAC and OBSeal) or your eIDAS certificates (QWAC and QSEAL). Depending on which type of certificates you are uploading, the required information may slightly differ.
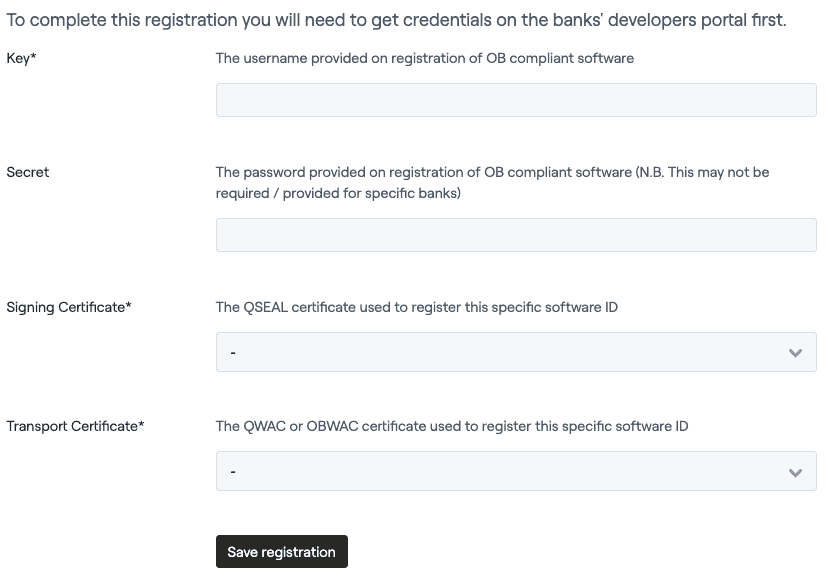
European example
In addition to the QWAC and QSEAL certificates, you should specify the following:
- Key : The username provided on registration of OB compliant software
- Secret : The password provided on registration of OB compliant software (N.B. This may not be required / provided for specific banks)
Note:
Different banks might require some additional parameters. You can learn more about the registration process of individual banks on the registration form page.
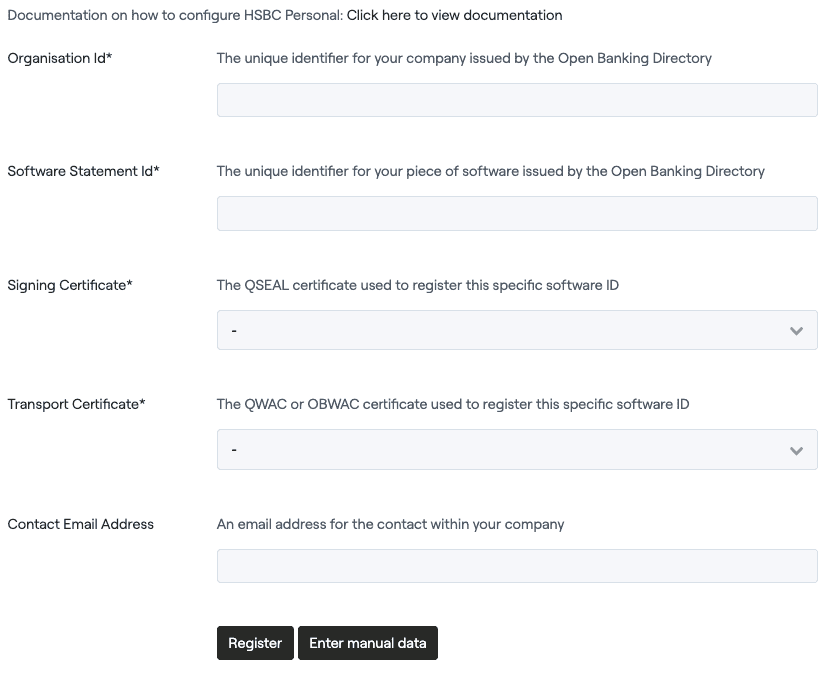
UK example
In addition to the OBWAC and OBSeal certificates, you should specify the following:
- Organisation Id : Obtained from the Open Banking Directory. See Organisation Details Overview to find this value
- Software Statement Id : Obtained from the Open Banking Directory. See Create a Software Statement to find this value
Manual registration
Manual bank registration requires you to register on the institution's developer portal.
Follow the documentation link included in the registration form for the Institution to obtain the necessary credentials.
Once you have obtained the credentials and entered them into the relevant fields, you can click the Register button to save the completed registration. This should automatically populate Key and Secret fields.
Dynamic client registration
Dynamic client registration (DCR) means you do not need to go through a bespoke registration process for this Institution.
In this case, you will be prompted for a Key and Secret and the Register button will be available. To complete the registration, click the Register button and if successful, the Institution will return a Key and optionally a Secret.
Delegated registration
If you are using Yapily Connect, all registration requirements are managed by Yapily.
To add an institution, please contact Support including each Institution you require. The institutions will be added to your service immediately if available.
Testing registrations
To test an Institution registration was successful, execute the appropriate authorisation for the Institution and verify that you are able to successfully redirect to the authorisationUrl (or in the case of an embedded Institution, verify that the request executes successfully).
For completeness, for redirect-based flows, you should attempt to log into the Institution using real, valid credentials. However, with the difficulty of sourcing accounts, successfully redirecting to the Institution log in page without errors is a generally a good indication that the registration was successful.
Failed registrations
If the registration fails when entering the credentials in the Console as described above, then please contact Support including the following information:
- Application ID or name
- Institution name
- Time of registration
- A description of the error message or a screenshot of the failure
If the registration in the Console was successful but there were issues testing the registration, please contact Support with the following information:
- Application ID or name
- Institution name
- Tracing ID
- A description of the error message or a screenshot of the failure