Single redirect
Introduction
A single redirect authorisation flow requires a user to be sent to their bank to authenticate themselves and securely give their consent to make a payment or share their financial data.
Features
An institution using the single redirect flow will support the following features:
Payments
-
INITIATE_DOMESTIC_PERIODIC_PAYMENT -
INITIATE_DOMESTIC_SCHEDULED_PAYMENT -
INITIATE_DOMESTIC_SINGLE_INSTANT_PAYMENT -
INITIATE_DOMESTIC_SINGLE_PAYMENT -
INITIATE_INTERNATIONAL_PERIODIC_PAYMENT -
INITIATE_INTERNATIONAL_SCHEDULED_PAYMENT -
INITIATE_INTERNATIONAL_SINGLE_PAYMENT -
INITIATE_BULK_PAYMENT
Data
-
INITIATE_ACCOUNT_REQUEST
Example flows
Callback URL
Single redirect flow using the Yapily default redirect URL and a callback URL:

-
Initiate the authorisation process
Make a request to
POST /account-auth-requestsorPOST /payment-auth-requests.Yapily will return an
authorisationUrl. The status of the authorisation isAWAITING_AUTHORIZATION.
-
Direct the end user to the
authorisationUrlThe end user is redirected to their bank to authenticate and authorise the consent request.
The bank then redirects the end user to the redirect URL. In this case
yapily.auth.com. The end user will then be redirected after a few milliseconds to the specified callback URL.During the redirect to Yapily, Yapily updates the consent object with the
consentToken. This is returned directly to you in the callback.The status of the authorisation is
AUTHORIZED.
Custom redirect URL
Single redirect flow using a custom redirect URL:
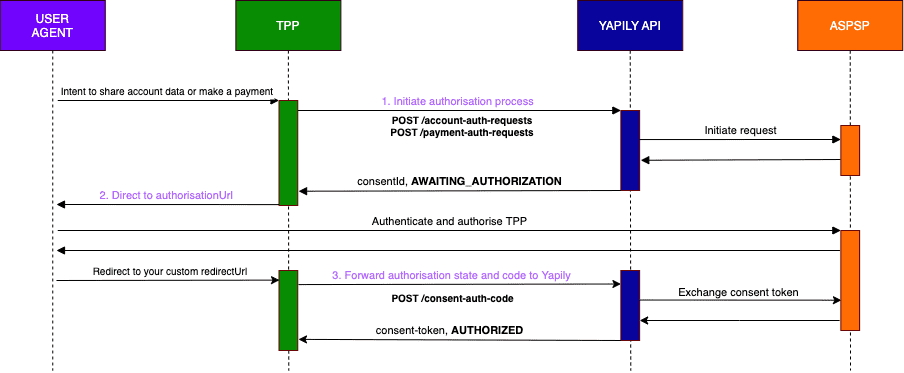
-
Initiate the authorisation process
Make a request to
POST /account-auth-requestsorPOST /payment-auth-requests.Yapily will return an
authorisationUrl. The status of the consent isAWAITING_AUTHORIZATION.
-
Direct the end user to the
authorisationUrlThe end user is redirected to their bank to authenticate and authorise the consent request.
The bank then redirects the end user to your custom redirect URL. The bank will also send an authorisation state and code to you.
-
Forward the authorisation state and code to Yapily
Make a request to
POST /consent-auth-code.Yapily then exchanges this with the bank and returns the
consentTokento you.The status of the consent is
AUTHORIZED.
Poll for consent
Single redirect flow using the Yapily default redirect URL and polling for consent:
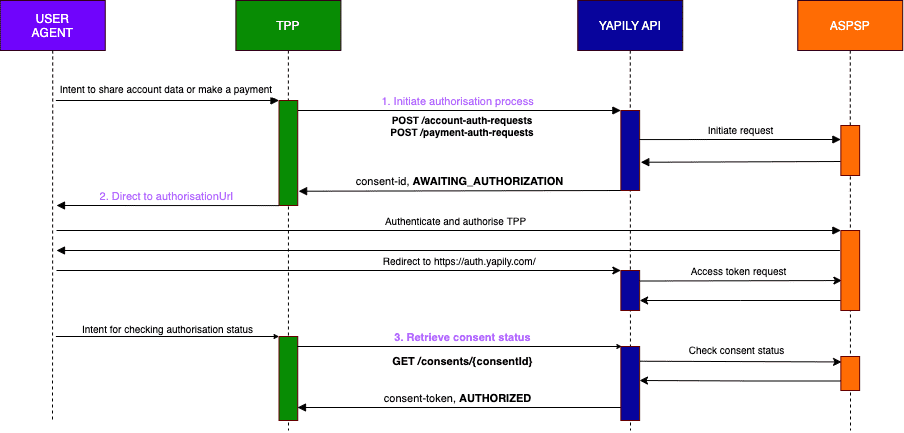
note
If you are using the Yapily default redirect URL, we recommend using a callback URL to automatically receive the consentToken. However, you may wish to also poll for consent for additional validation.
-
Initiate the authorisation process
Make a request to
POST /account-auth-requestsorPOST /payment-auth-requests.Yapily will return an
authorisationUrl. The status of the consent isAWAITING_AUTHORIZATION.
-
Direct the end user to the
authorisationUrlThe end user is redirected to their bank to authenticate and authorise the consent request.
The bank then redirects the end user to the redirect URL. In this case,
yapily.auth.com. During the redirect to Yapily, Yapily updates the consent object with theconsentToken.
-
Retrieve the
consentTokenand statusPoll the result of GET Consent until the consent object is updated with the
consentTokenand the status of the consent transitions toAUTHORIZED.