Redirect URL
Introduction
The redirect URL specifies where the bank should redirect the end user to after they have authenticated and authorised an authorisation request in the bank's application.
In addition, if authentication is successful, it obtains the access token from the institution or, if unsuccessful, it returns information to explain the failure.
How you use the redirect URL depends whether you register with institutions directly or through Yapily Connect:
-
Direct registration:
If you are a regulated entity using your own banking certificates to register with institutions, the redirect URL is supplied and managed by you.
- Yapily Connect: If you are a Yapily Connect customer, the redirect URL is supplied and managed by Yapily. In this case, you can use the callback URL to control the user journey after the redirect.
Direct registration
You must supply at least 1 redirect URL in your software statement when registering with each institution. You should use your application server address as the redirectUrl so end users are sent directly back to your application when they have completed the authorisation process with the bank.
Configuring the redirect URL
Note
This section only applies if you are using your own certificates to register with institutions in the UK.
- Go to the Open Banking Directory and select Login
- Login with your email and password
- Authenticate with PingId
- Select your entity from the dropdown
- Once redirected, click on the Directory link
- Scroll to the bottom of the menu to view your software statements
- Select the software statement you plan to use with each Yapily institution
- Add a new redirect URL
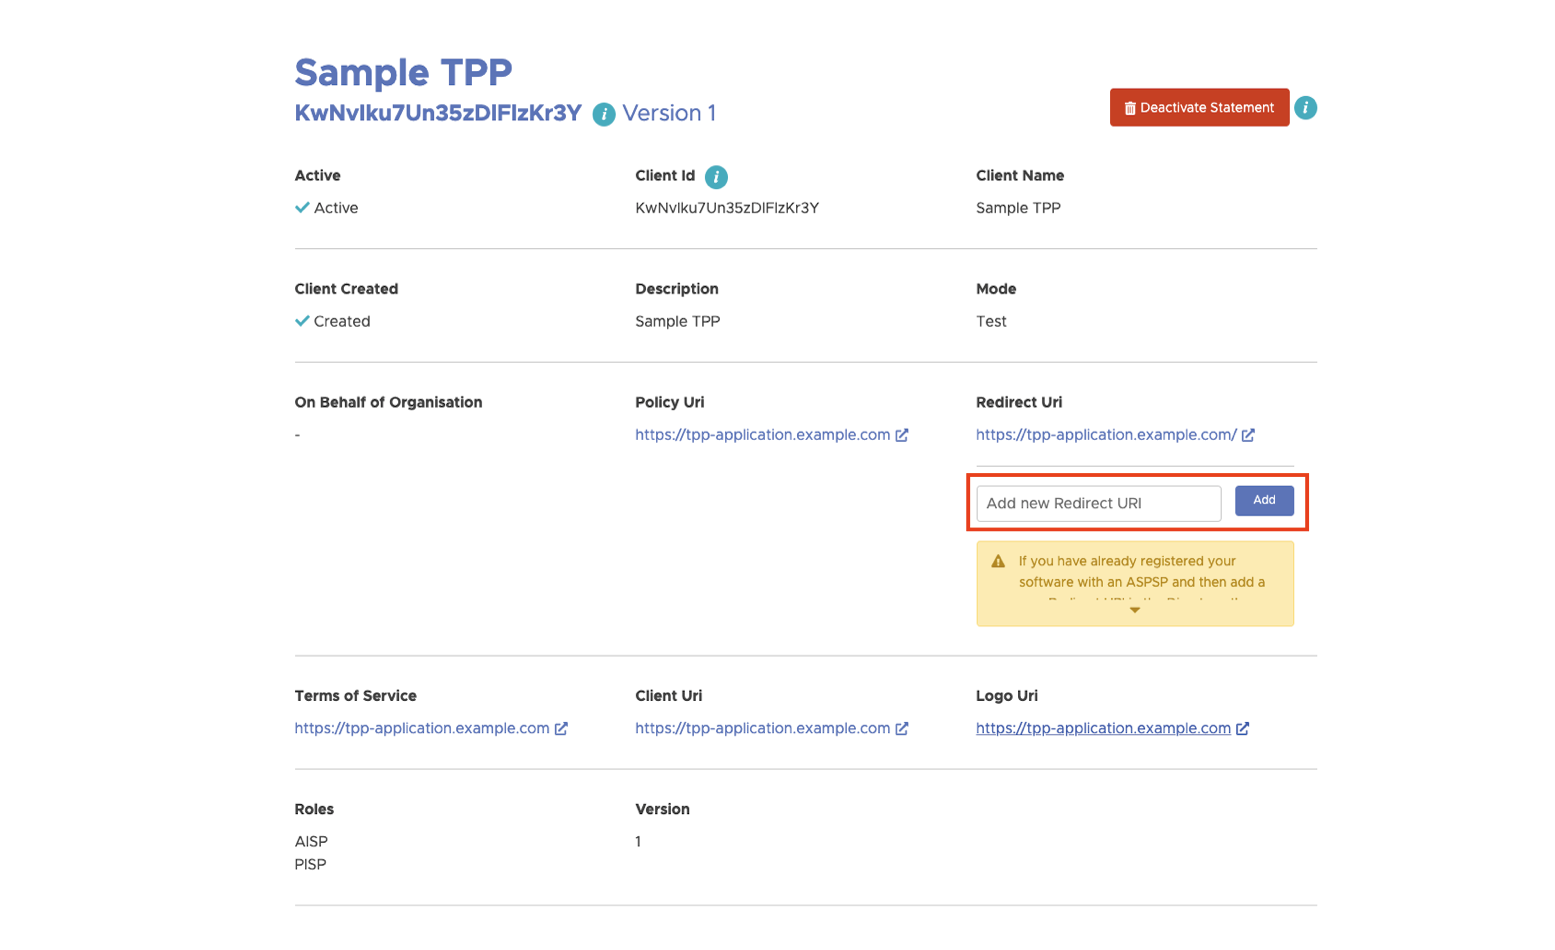
Contact support@yapily.com to confirm that your redirect URL is being used in your application.
Note: Open Banking Directory does not allow you to edit or remove unused software statements.
Modifying redirect URLs
The Open Banking Directory only allows AISPs and PISPs to add new redirects to an existing software statement.
If you add a new redirect to your software statement that you want an institution to use and you have already registered with that institution, you need to re-register the institution again.
To re-register each institution, you need to repeat the institution registration process for the institution.
warning
Re-registering with an institution will result in you losing all existing consents for that institution.
As a result, for account data use cases, you need to request all your users to re-consent. For payments use cases you lose the ability to check the status of any payments with existing consents.
Deep-linking for applications
Mobile
On mobile you can specify a deep link redirectUrl in your application. This enables users to open your application after leaving the institution.
Note: When a deep link has a custom URI scheme (not http or https) it will link to content that can only be accessed if the application is installed on the device.
Web and mobile
For journeys including web and mobile, you can use App Links for Android and Universal Links for iOS.
Both are special types of deep links that you can set as your redirect URL, but these must must use either the http or https URI schemes.
The benefit of these deep links is that, in addition to opening your mobile app if it is installed, they also enable deferred deep-linking. This means, if the mobile app is not installed, rather than failing, it redirects the user to where they can install your app and then continues the journey in your app when it is installed. This improves user experience.
Note
The Open Banking Directory only supports redirect URLs that use the http and https schemes so be sure to create deep-links with the appropriate scheme.
Specifying the redirect URL
When making authorisation requests, you should use the redirect property to specify which url to use:
{
"applicationUserId": "john.doe@company.com",
"institutionId": "modelo-sandbox",
"redirect": {
"url": "https://tpp-application.com/"
}
}Handling the redirect URL response
When you use a custom redirect URL, Yapily's authorisation service doesn't automatically exchange the access token received by the institution for a consentToken which is required to make further calls with the Yapily API.
As a result, you need to make an additional call to forward the OAuth2 code to Yapily so we can exchange it to obtain a consentToken to return to you.
You need:
- a frontend application that can consume uri fragments
- a server to issue the token exchange and any subsequent requests to the Yapily API

Success query parameters
You need to forward the authCode and authState as body parameters in the request to POST /consent-auth-code. Both values are obtained as uri fragments from the institution.
If the user successfully authorises the authorisation request, the redirectUrl returns the following fragments:
-
state: this is a unique identifier (UUID) that is controlled by Yapily and sent to the institution to uniquely identify the authorisation. While Yapily controls this parameter, this is also available to you in the response of the authorisation request.
-
code: the code is the response from the institution that allows Yapily to obtain the access tokens for the authorisation. Note: The format is not consistent across each institution.
-
id_token: this is a JWT that contains more information about the user's request. Note: This is not always returned by every institution, especially in Europe.
Failure query parameters
If the authorisation fails a different set of fragments are returned on the redirectUrl to help explain what has occurred:
-
state: this is a unique identifier (UUID) that is controlled by Yapily and sent to the institution to uniquely identify the authorisation. While Yapily controls this parameter, this is also available to you in the response of the authorisation request.
-
error: this is a message sent by the institution explaining the reason for the failure in plain text. Note: The level of detail provided depends on the institution.
Possible reasons for failure:
- user rejects the consent request
- issue with the institution
Masked redirect URL
The masked redirect URL option allows you to use Yapily's auth service https://auth.yapily.com/ while masking the URL with the URL of your domain.
The benefit of this option is that Yapily handles the institution response. Yapily's auth service automatically retrieves the consentToken or provides a failure message and categorisation if there was an issue. Yapily also logs every redirect to the URL.
However, you can't control the UI elements of https://auth.yapily.com/.
Configuring masked redirect URL
In step 8 of configuring the redirect URL, you
need to add a CNAME record redirectUrl mapping the URL you want your customers to see to https://auth-callback.yapily.com.
Your DevOps team can configure this in your domain provider's DNS settings by adding a new DNS record. For example:
auth.tpp-domain.com CNAME auth-callback.yapily.comYou can validate the CNAME is configured correctly, by running the nslookup utility using the Terminal application on Mac or Powershell on Windows:
Successful configuration:
> nslookup auth.tpp-domain.com
Server: 123.123.123.123
Address: 111.111.111.111#53
Non-authoritative answer:
auth.tpp-domain.com canonical name = auth-callback.yapily.com.
auth-callback.yapily.com canonical name = production-nginx.yapily.com.
Name: production-nginx.yapily.com
Address: 35.189.115.193Unsuccessful configuration:
> nslookup auth.tpp-domain.com
Server: 123.123.123.123
Address: 111.111.111.111#53
** server can't find auth.tpp-domain.com: NXDOMAINOnce successfully configured, get in contact with our Support Team to request the finalisation of the the configuration on Yapily's server and to ensure that your application is configured to use the CNAME.
warning
Adding a new CNAME record to your software statement may result in you losing all existing consents if you are modifying an existing registration and are-registering each Institution.
Yapily Connect
Yapily provides a default redirect URL https://auth.yapily.com/.
You cannot change the redirect URL. However, we recommend using the callback URL to redirect from https://auth.yapily.com/ back to your application.
See more information on how to implement the callback URL.