> ## Documentation Index
> Fetch the complete documentation index at: https://docs.yapily.com/llms.txt
> Use this file to discover all available pages before exploring further.
# UK Prerequisites
> UK Open Banking Directory setup guide for regulated AISPs and PISPs. Covers OBIE registration, software statement creation, and transport certificate configuration.
## Access to Open Banking Directory
To begin the process of setting up all that is required for registering each `Institution` in the UK, you will need access to the [Open Banking Directory](https://directory.openbanking.org.uk/s/) where you will be prompted to log in using the PingId authentication mobile application. If you have not already gone through the process of setting this up, you will need to go through their [enrolment process](https://www.openbanking.org.uk/wpcore/wp-content/uploads/Enrolling-Onto-Open-Banking-Guide.pdf) first.
## Entity Selection
Once logged in, you will be able to see your organisation as one of the available entities:
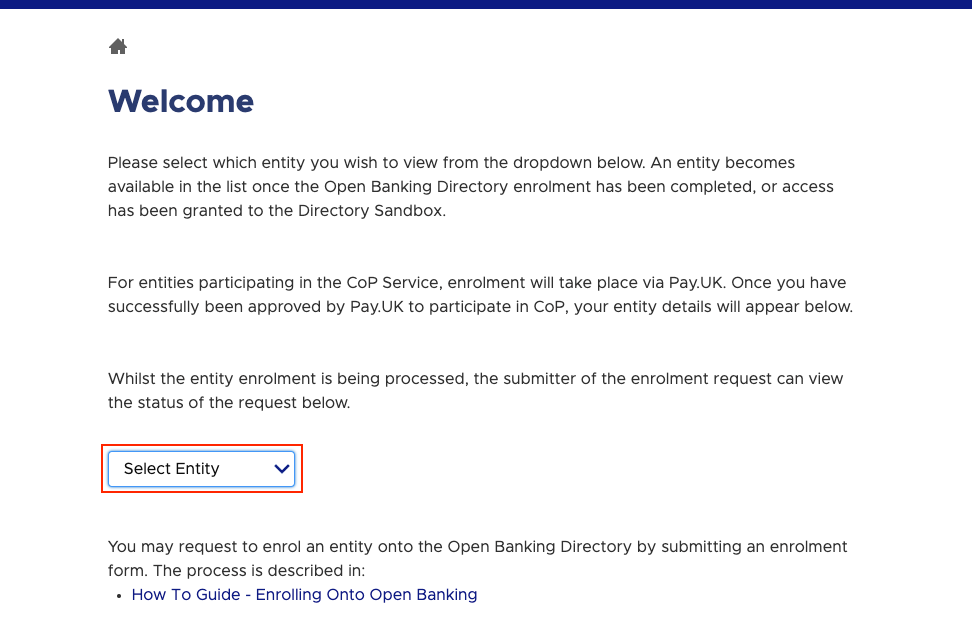 Once choosing your entity, you will then have the ability to go several pages:
* **Contacts**: Manage access to who has access to features in the Open Banking Directory
* **Entity Information**: Here you will have key information about your organisation
* **Directory Sandbox**: Here you can manage the configuration for registering with sandboxes
* **Directory**: Here you can manage the configuration for live banks
To continue, select the *Directory (PSD2)* option:
Once choosing your entity, you will then have the ability to go several pages:
* **Contacts**: Manage access to who has access to features in the Open Banking Directory
* **Entity Information**: Here you will have key information about your organisation
* **Directory Sandbox**: Here you can manage the configuration for registering with sandboxes
* **Directory**: Here you can manage the configuration for live banks
To continue, select the *Directory (PSD2)* option:
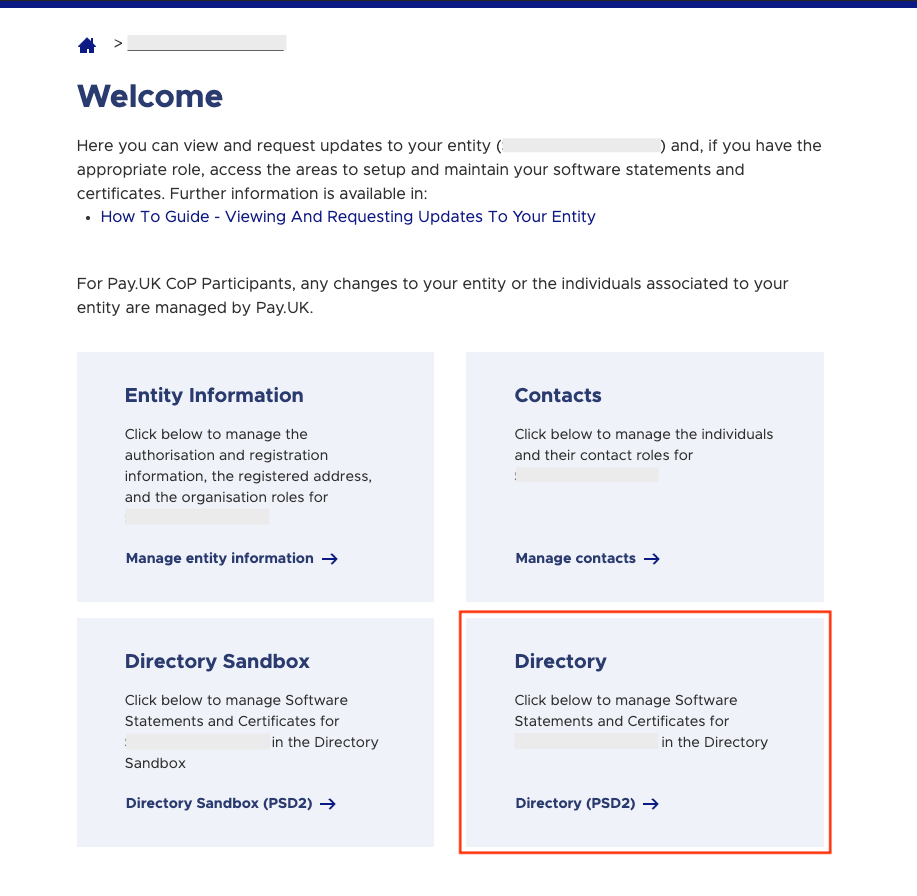 If this option does not appear for you, you will need to speak to someone with the right permissions to give you access.
## Organisation Details Overview
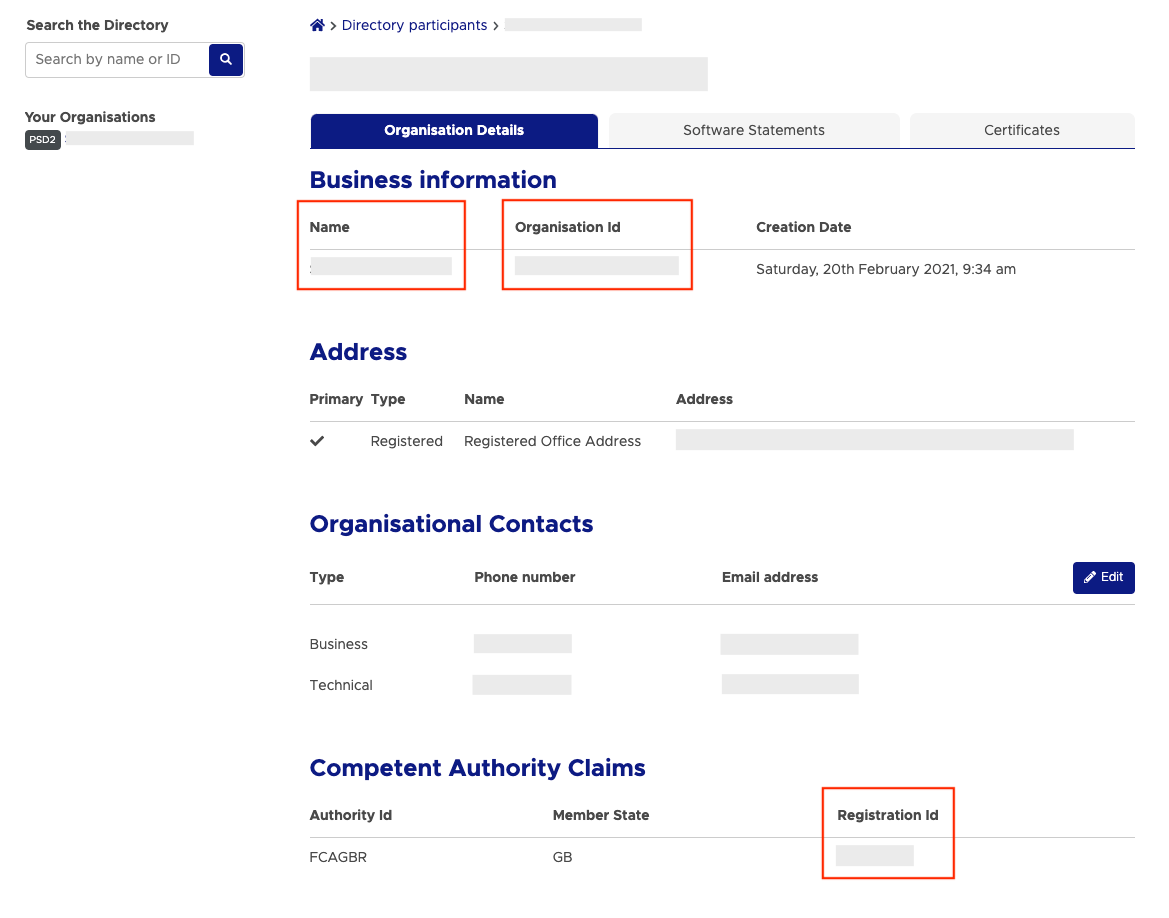
Once logged into the *Directory (PSD2)* of the appropriate entity, you will see an overview of your organisation details.
Take note of the following fields which will be required when creating your certificates:
1. **Business Information Name**: Your registered company name
2. **Business Information Organisation Id**: Your organisation identifier
3. **Competency Authority Claims Registration Id**: The registration identifier from your National Competent Authority (the FCA in the UK)
4. **Competency Authority Claims Authorisations**: Take note of which roles you're approved for e.g. AISP and/or PISP
If this option does not appear for you, you will need to speak to someone with the right permissions to give you access.
## Organisation Details Overview
Once logged into the *Directory (PSD2)* of the appropriate entity, you will see an overview of your organisation details.
Take note of the following fields which will be required when creating your certificates:
1. **Business Information Name**: Your registered company name
2. **Business Information Organisation Id**: Your organisation identifier
3. **Competency Authority Claims Registration Id**: The registration identifier from your National Competent Authority (the FCA in the UK)
4. **Competency Authority Claims Authorisations**: Take note of which roles you're approved for e.g. AISP and/or PISP
 ## Create Certificates
From the *Organisation Details* tab, select the *Certificates* tab and select the *Add New Organisation Certificate* option to create a new set of certificates:
## Create Certificates
From the *Organisation Details* tab, select the *Certificates* tab and select the *Add New Organisation Certificate* option to create a new set of certificates:
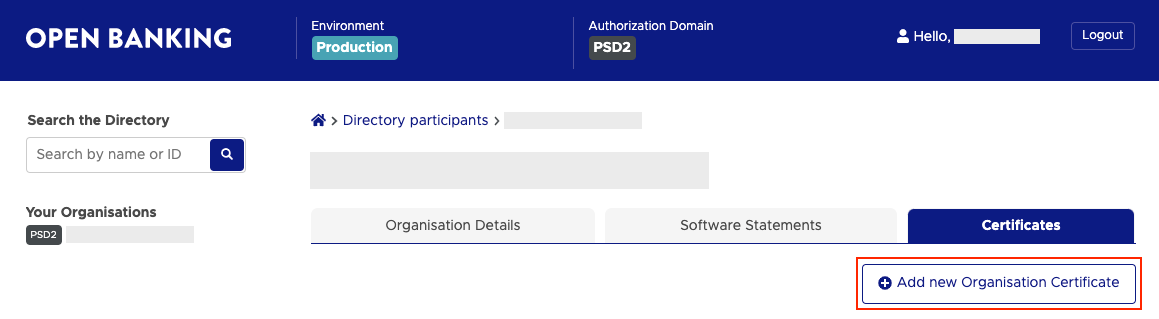 On this page, you will need to create and upload two new certificates created via the \`openssl\` utility in a shell on your laptop. For the UK, you will need to upload one *OB Seal (Signing)* and one *OB WAC (Transport)* certificate to successful authenticate yourself with each \`Institution\`:
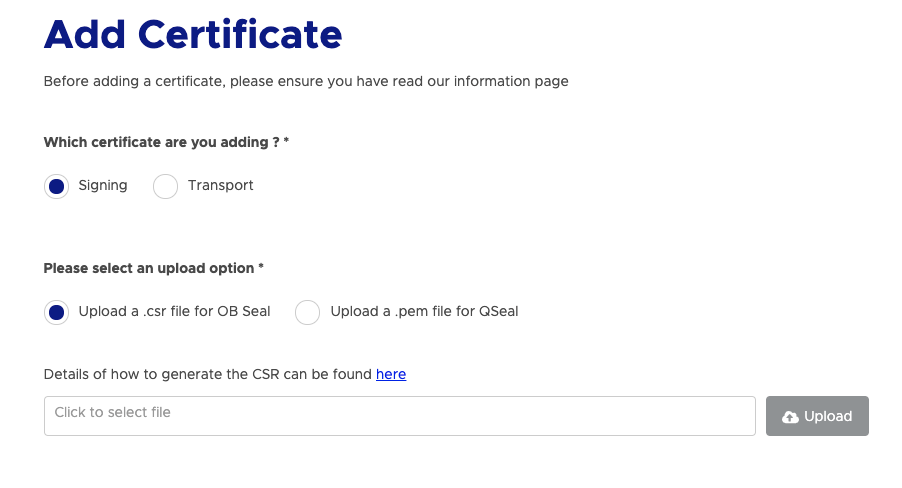 In order to create the certificates, you will need the following details listed in the [Organisation Details Overview](#organisation-details-overview). You can use the following [helper repo](https://github.com/yapily/registration-scripts) to walk through the process of creating and uploading the certificates to the Open Banking Directory.
## Create a Software Statement
A software statement is a collection of information that describes the purpose of your Open Banking application for each \`Institution\` in the UK that your customers will be connecting to.
You can have multiple software statements to separate out your different environments or use-cases e.g. your staging application vs your production application or your mobile traffic vs your web traffic.
To create a software statement, from the *Organisation Details* tab, select the *Software Statements* tab and select the *Add new Software Statement* option to create a new software statement:
In order to create the certificates, you will need the following details listed in the [Organisation Details Overview](#organisation-details-overview). You can use the following [helper repo](https://github.com/yapily/registration-scripts) to walk through the process of creating and uploading the certificates to the Open Banking Directory.
## Create a Software Statement
A software statement is a collection of information that describes the purpose of your Open Banking application for each \`Institution\` in the UK that your customers will be connecting to.
You can have multiple software statements to separate out your different environments or use-cases e.g. your staging application vs your production application or your mobile traffic vs your web traffic.
To create a software statement, from the *Organisation Details* tab, select the *Software Statements* tab and select the *Add new Software Statement* option to create a new software statement:
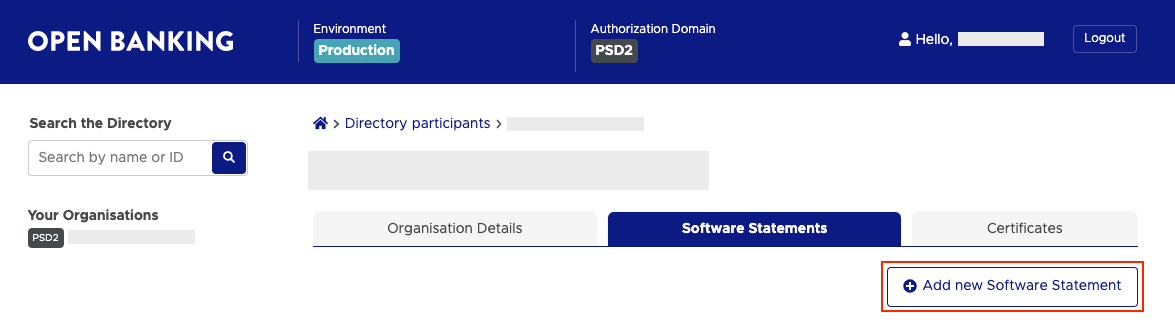 You will then be prompted to fill in some information about your business. The fields that are particularly important are listed below:
* **Client Name**: This is the name of your business that will be visible to the PSU in the \`Institution\`
* **Role**: This defines whether you will be permitted to use AISP and/or PISP functionality with this software statement
* **Policy URI**: A link to your organisation's policies
* **Terms of Service**: A link to your organisation's terms of service
* **Client URI**: A link to your organisation's home page
* **Logo URI**: A link to your organisation's logo
* **Redirect URI**: One or more [redirectUrls](/open-banking-flow/handling-redirects/redirect-url) that your software will use
You will then be prompted to fill in some information about your business. The fields that are particularly important are listed below:
* **Client Name**: This is the name of your business that will be visible to the PSU in the \`Institution\`
* **Role**: This defines whether you will be permitted to use AISP and/or PISP functionality with this software statement
* **Policy URI**: A link to your organisation's policies
* **Terms of Service**: A link to your organisation's terms of service
* **Client URI**: A link to your organisation's home page
* **Logo URI**: A link to your organisation's logo
* **Redirect URI**: One or more [redirectUrls](/open-banking-flow/handling-redirects/redirect-url) that your software will use
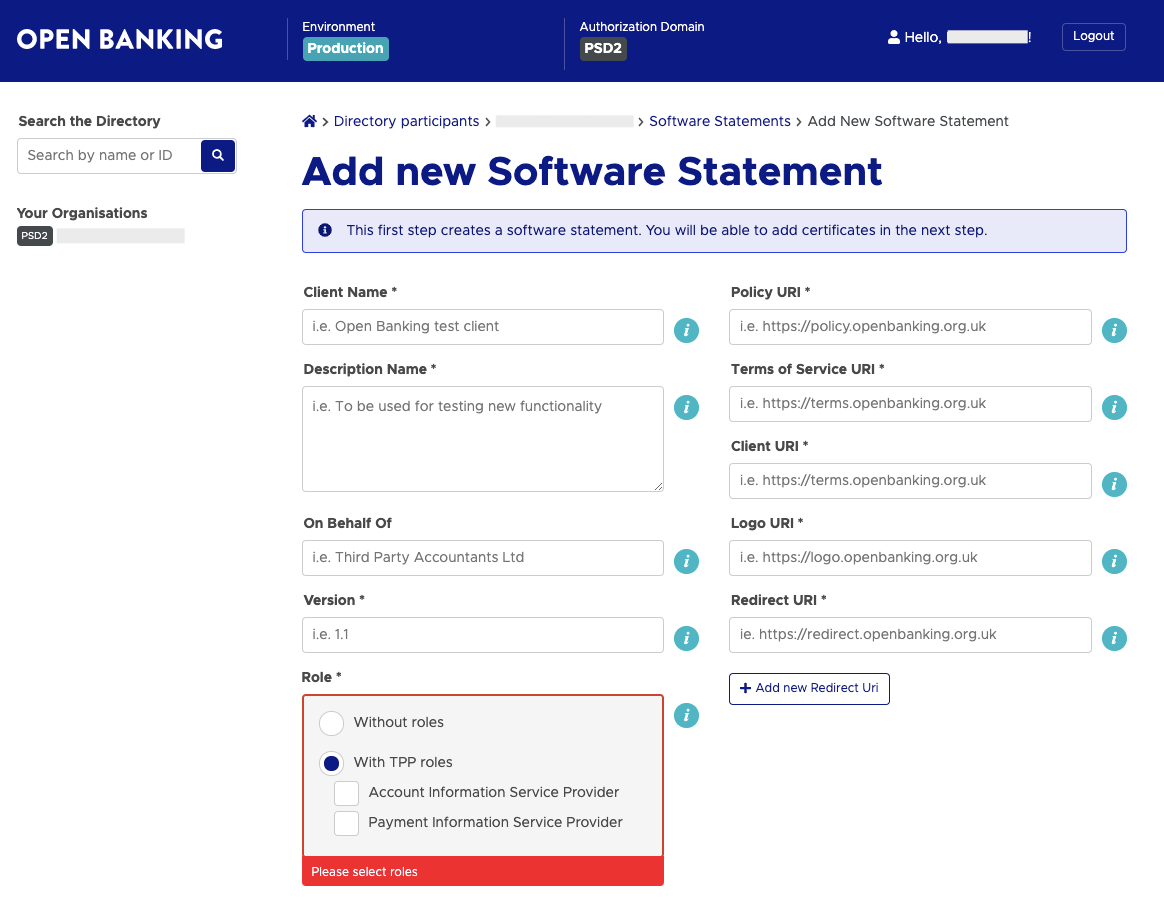 After you have filled in all the required fields, select the *Submit* option to persist the changes.
Now the *Client Id* otherwise known as the *Software Statement Id* is available which will later be used as part of the [Bank Registration Process](/getting-started/integration-setup/registration#3-register-institutions):
After you have filled in all the required fields, select the *Submit* option to persist the changes.
Now the *Client Id* otherwise known as the *Software Statement Id* is available which will later be used as part of the [Bank Registration Process](/getting-started/integration-setup/registration#3-register-institutions):
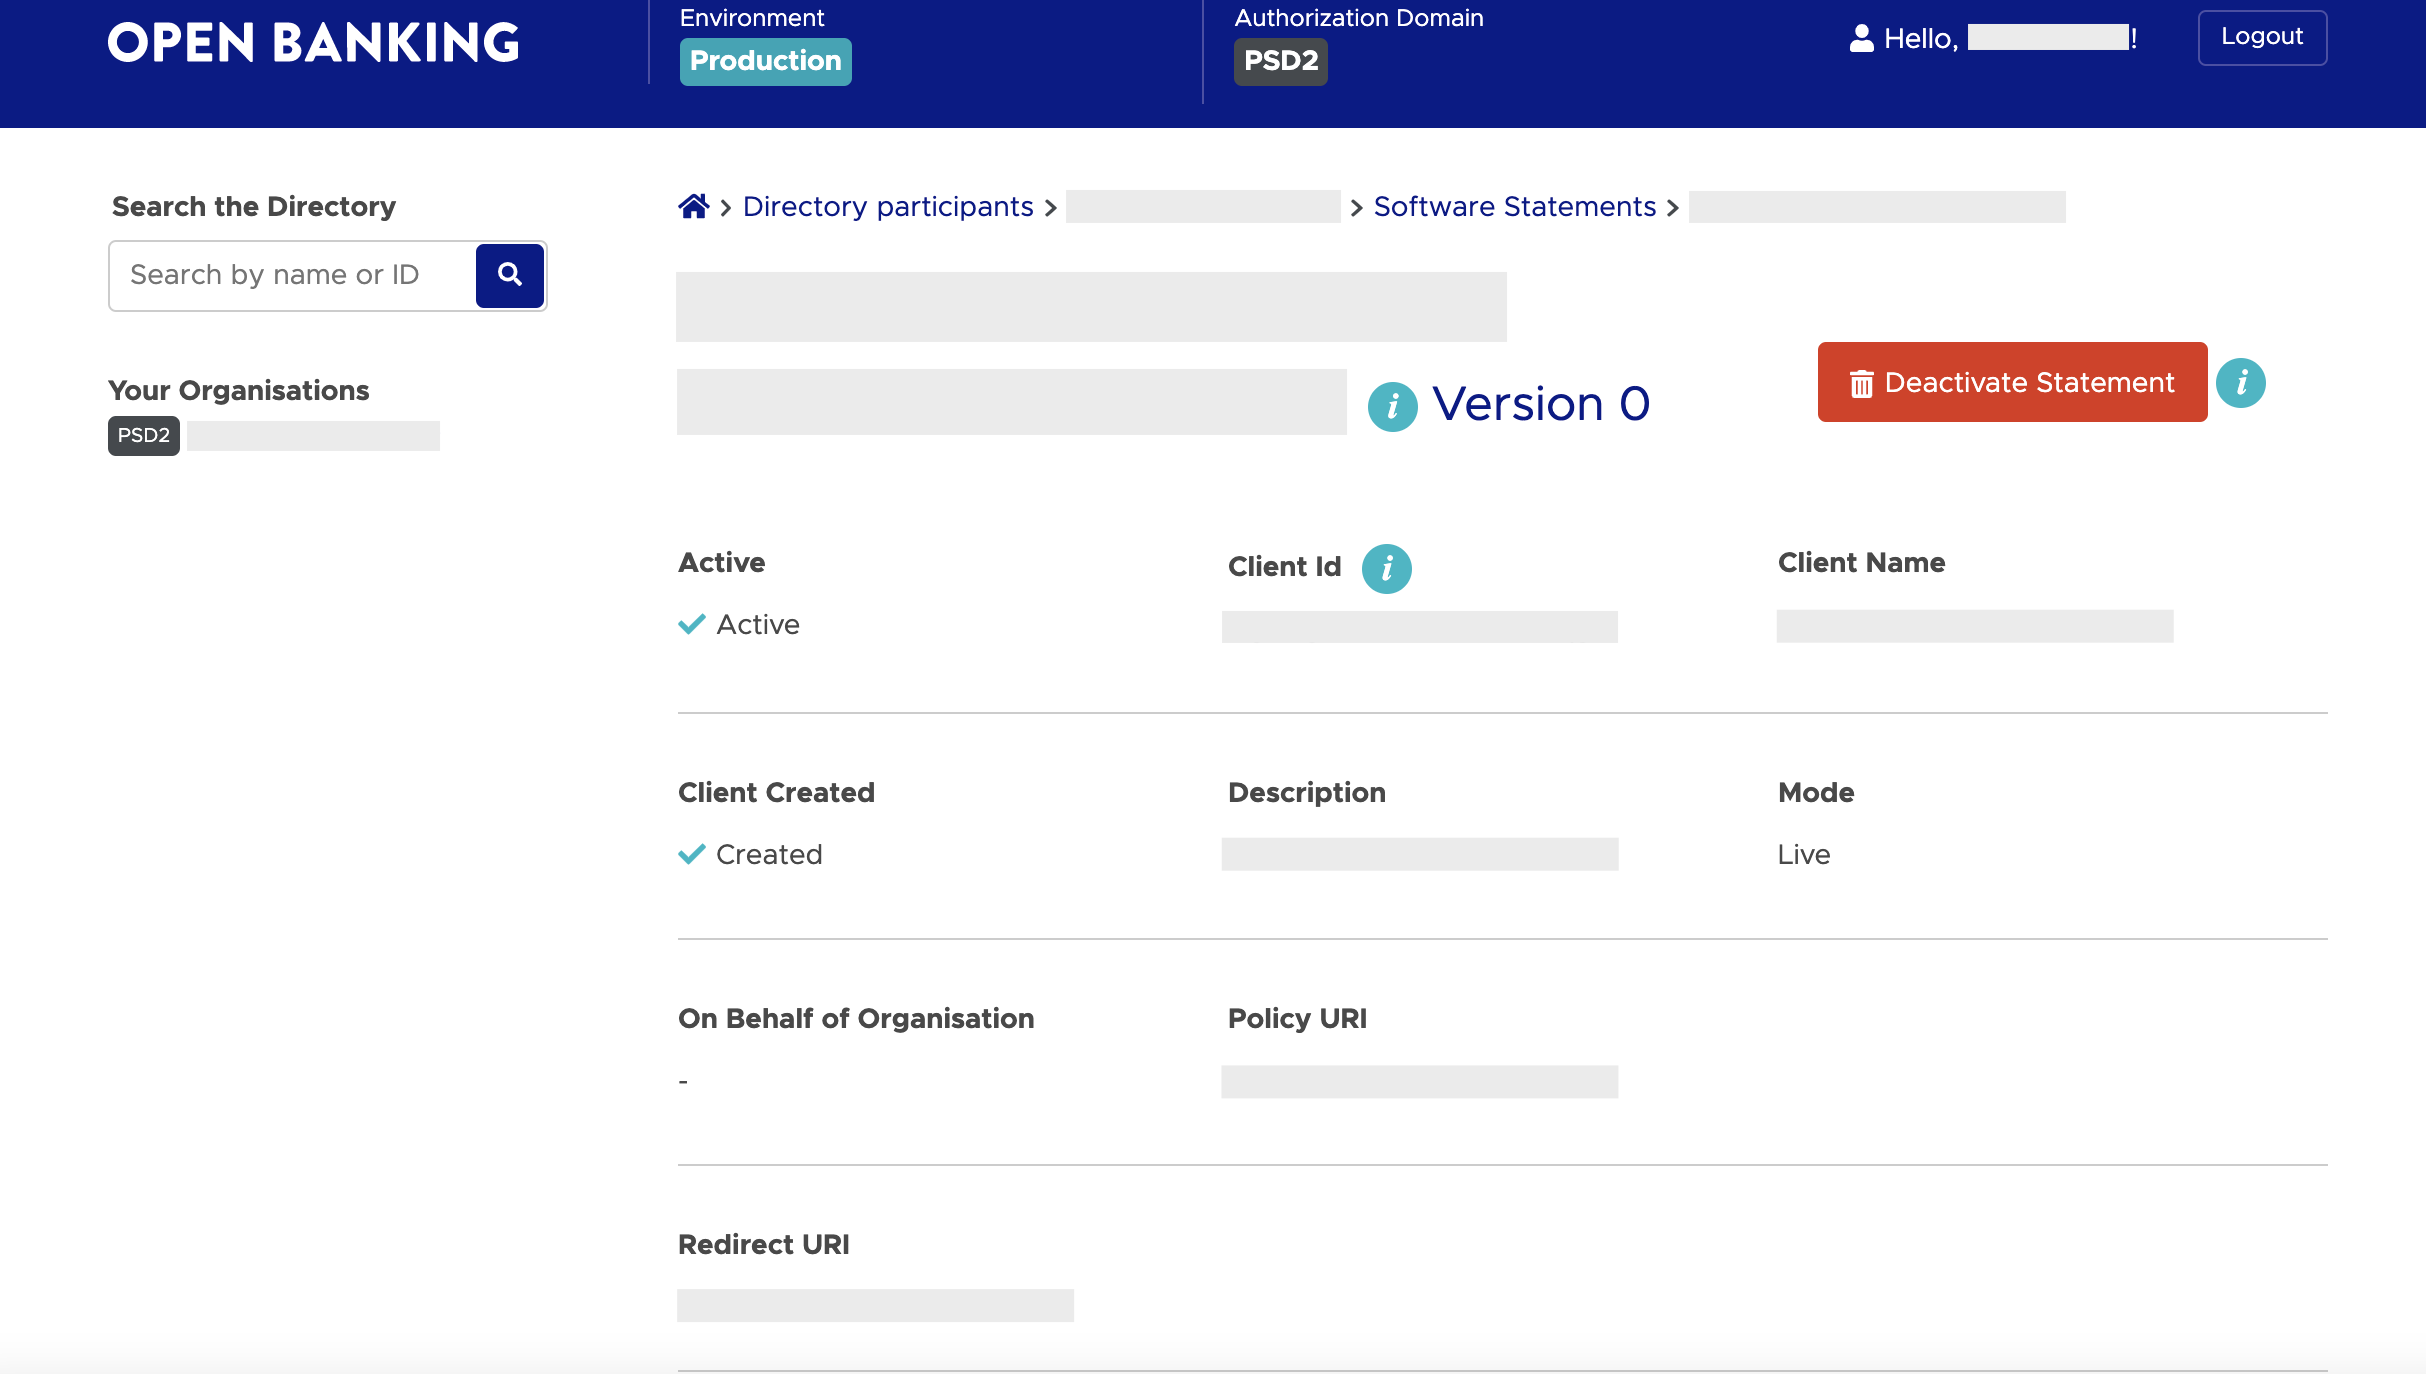 Software statements can not be edited or deleted after creation, however, you have the ability to add more redirects to an existing software statement or to completely add new software statements. Be aware that as you edit or create new software statements, that you will have to go through the process of [Bank Registration](/getting-started/integration-setup/registration#3-register-institutions) again for each \`Institution\`.
## Assigning Certificates to a Software Statement
The last step for finalising the Software Statement is to assign so valid certificates to it. If you scroll to the *Keys/certificates* section, you should be able to see the organisational level OB WAC and OB SEAL certificates you created:
Software statements can not be edited or deleted after creation, however, you have the ability to add more redirects to an existing software statement or to completely add new software statements. Be aware that as you edit or create new software statements, that you will have to go through the process of [Bank Registration](/getting-started/integration-setup/registration#3-register-institutions) again for each \`Institution\`.
## Assigning Certificates to a Software Statement
The last step for finalising the Software Statement is to assign so valid certificates to it. If you scroll to the *Keys/certificates* section, you should be able to see the organisational level OB WAC and OB SEAL certificates you created:
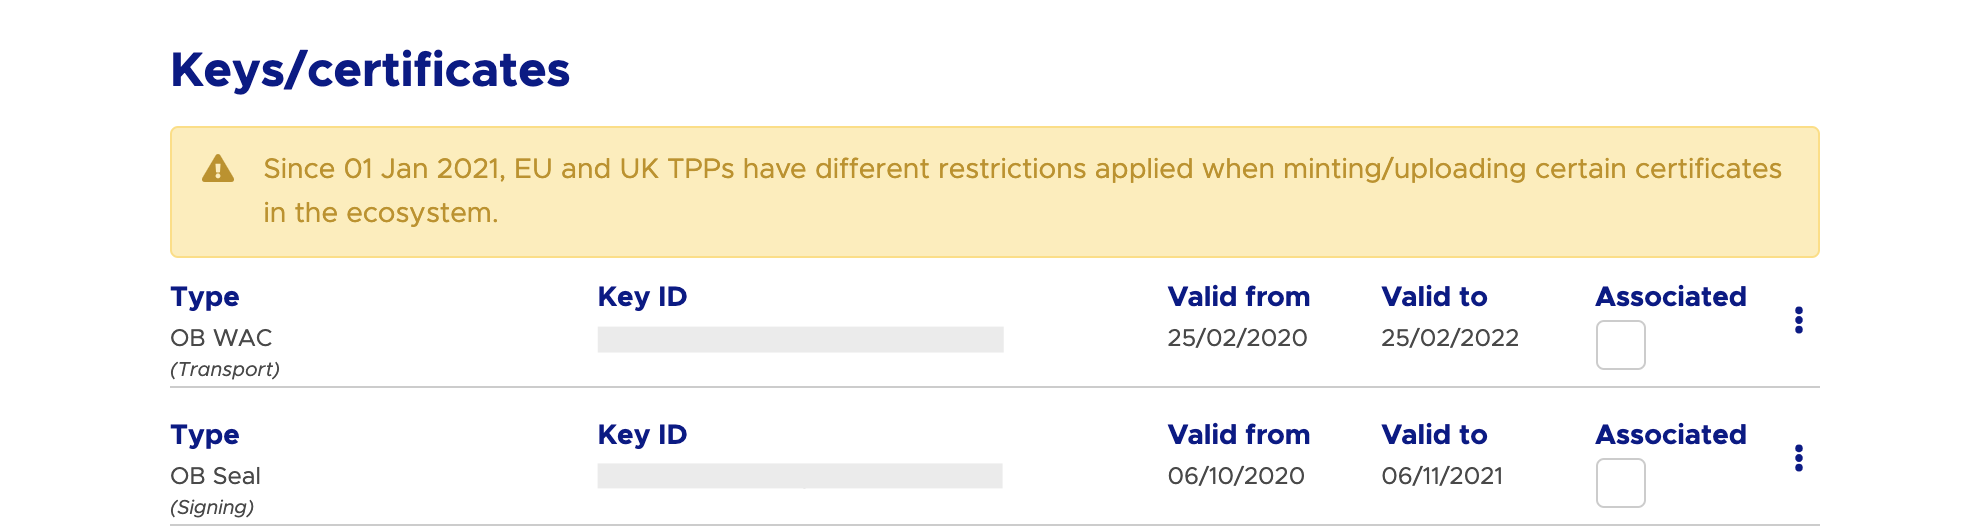 Make sure to check the *Associated* check box in order to assign both certificates to your software statement. If successful, a confirmation pop up should appear to confirm each assignment was successful. If you have multiple software statements, you're able to use the same set of certificates, so in theory, you could only have one set of certificates used across all your Software Statements.
Take note of the expiry date for both of the certificates and set a reminder as when the expiry date for you certificates occur, they will no longer be valid to authenticate requests made to each \`Institution\`. You will need to perform [Certificate Renewals](#certificate-renewals) in good time to prevent any downtime due to expired certificates.
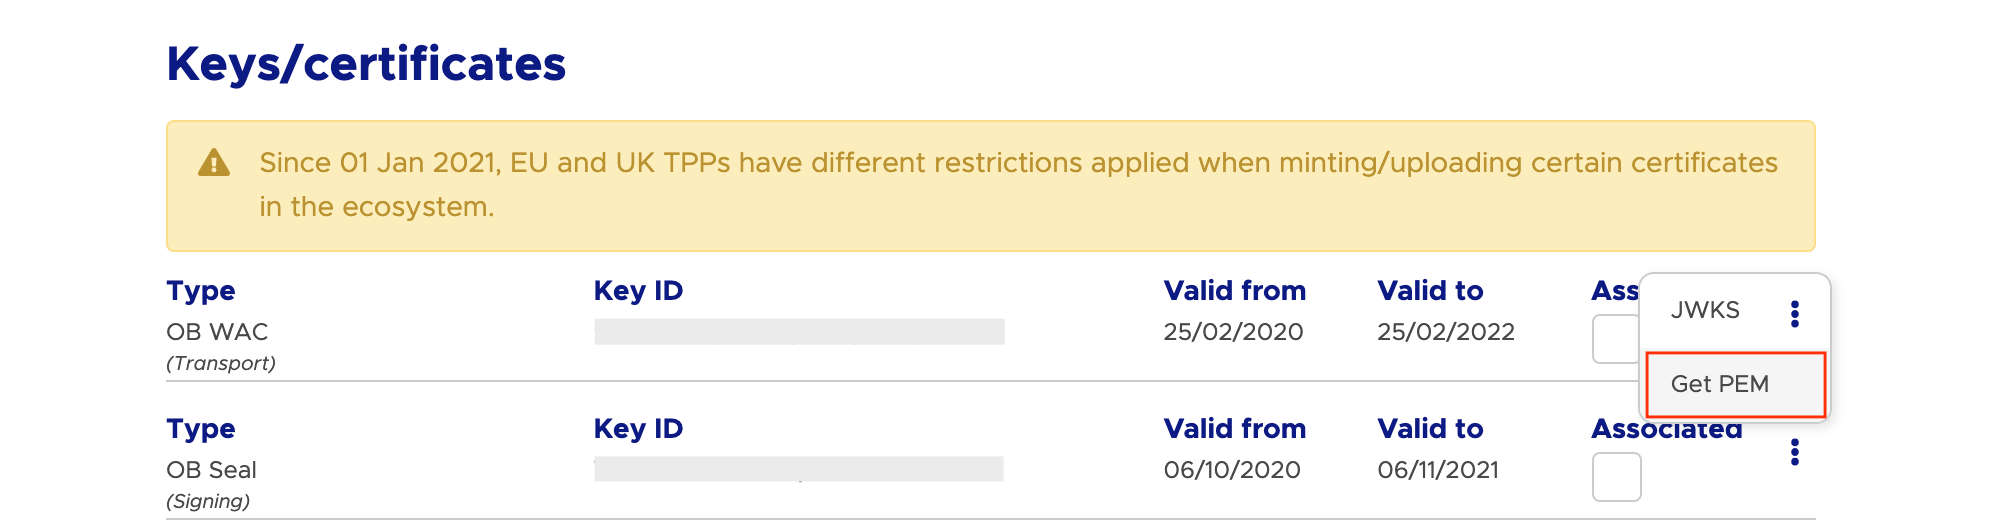
Finally, download the PEM files for both the OB WAC and OB SEAL by clicking on the three dots in each row and selecting the *Get PEM* option:
Make sure to check the *Associated* check box in order to assign both certificates to your software statement. If successful, a confirmation pop up should appear to confirm each assignment was successful. If you have multiple software statements, you're able to use the same set of certificates, so in theory, you could only have one set of certificates used across all your Software Statements.
Take note of the expiry date for both of the certificates and set a reminder as when the expiry date for you certificates occur, they will no longer be valid to authenticate requests made to each \`Institution\`. You will need to perform [Certificate Renewals](#certificate-renewals) in good time to prevent any downtime due to expired certificates.
Finally, download the PEM files for both the OB WAC and OB SEAL by clicking on the three dots in each row and selecting the *Get PEM* option:
 ## Naming your Open Banking Certificates
Now, you are ready to [upload the certificates to the Yapily Console](/getting-started/integration-setup/registration#2-upload-certificates). In order to help with better identifying your certificates, you can rename each of the files accordingly:
\`\`\`shell
\[cert-type].\[company-name].KID.\[cert-kid].\[file-extension]
\`\`\`
You should end up with the following four files:
\`\`\`shell
obwac.\[company-name].KID.\[obwac-cert-kid].key
obwac.\[company-name].KID.\[obwac-cert-kid].pem
obseal.\[company-name].KID.\[obseal-cert-kid].key
obseal.\[company-name].KID.\[obseal-cert-kid].pem
\`\`\`
## Generating a Software Statement Assertion
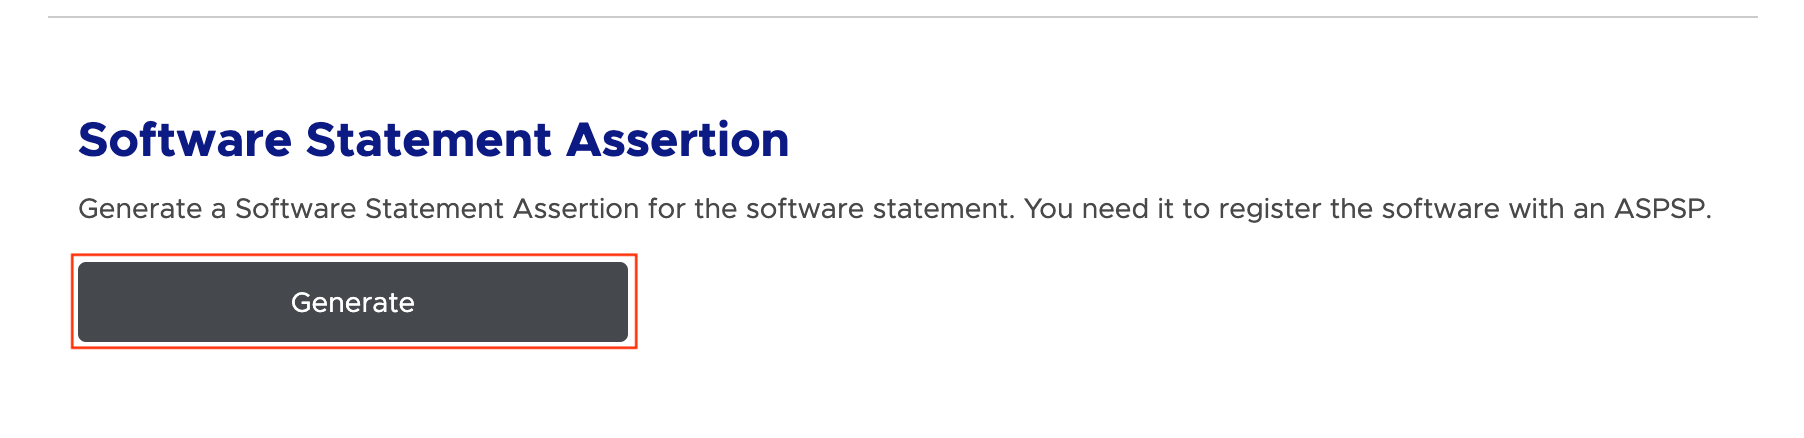
For any \`Institution\` that has a [manual registration process](/getting-started/integration-setup/registration#manual-registration), you may be required to provide a *Software Statement Assertion* to the \`Institution\` during the registration. This is token essentially holds all the information about your software statement such as the redirect url to use and is what the \`Institution\` will use to validate any requests that you initiate to the \`Institution\` on the behalf of the PSU.
To generate a *Software Statement Assertion*, scroll to the bottom of the page on the *Software Statement* tab for the intended software statement and select the *Generate* button:
## Naming your Open Banking Certificates
Now, you are ready to [upload the certificates to the Yapily Console](/getting-started/integration-setup/registration#2-upload-certificates). In order to help with better identifying your certificates, you can rename each of the files accordingly:
\`\`\`shell
\[cert-type].\[company-name].KID.\[cert-kid].\[file-extension]
\`\`\`
You should end up with the following four files:
\`\`\`shell
obwac.\[company-name].KID.\[obwac-cert-kid].key
obwac.\[company-name].KID.\[obwac-cert-kid].pem
obseal.\[company-name].KID.\[obseal-cert-kid].key
obseal.\[company-name].KID.\[obseal-cert-kid].pem
\`\`\`
## Generating a Software Statement Assertion
For any \`Institution\` that has a [manual registration process](/getting-started/integration-setup/registration#manual-registration), you may be required to provide a *Software Statement Assertion* to the \`Institution\` during the registration. This is token essentially holds all the information about your software statement such as the redirect url to use and is what the \`Institution\` will use to validate any requests that you initiate to the \`Institution\` on the behalf of the PSU.
To generate a *Software Statement Assertion*, scroll to the bottom of the page on the *Software Statement* tab for the intended software statement and select the *Generate* button:
 You can then copy the output using the *Copy to clipboard* option as and when needed.
## Certificate Renewals
The only time you should be concerned about creating new certificates is when your certificates are about to expire. You should set a reminder in good time to go through the process of creating new certificates before they expire.
When this time comes, you do not need to go through the full bank registration process, however, you must [create new certificates](#create-certificates) and [assign them to your software statement(s)](#assigning-certificates-to-a-software-statement) and also [add these new certificates to the Yapily Console](/getting-started/integration-setup/registration#2-upload-certificates). Finally, you need to make sure each \`Institution\` registration uses your new certificates on the first page of the \`Institution\` registration in the Yapily Console.
***
Back to [registration](/getting-started/integration-setup/registration)
You can then copy the output using the *Copy to clipboard* option as and when needed.
## Certificate Renewals
The only time you should be concerned about creating new certificates is when your certificates are about to expire. You should set a reminder in good time to go through the process of creating new certificates before they expire.
When this time comes, you do not need to go through the full bank registration process, however, you must [create new certificates](#create-certificates) and [assign them to your software statement(s)](#assigning-certificates-to-a-software-statement) and also [add these new certificates to the Yapily Console](/getting-started/integration-setup/registration#2-upload-certificates). Finally, you need to make sure each \`Institution\` registration uses your new certificates on the first page of the \`Institution\` registration in the Yapily Console.
***
Back to [registration](/getting-started/integration-setup/registration)